Maximizing Channel-to-Channel Isolation on PCBs for Multichannel Beamformers

Good channel-to-channel isolation is critical for maintaining performance in beamformer integrated circuits (BFICs). Channel-to-channel gain settings in phased-array applications can vary significantly to achieve the desired element tapering for sidelobe reduction and muting (a 30-dB difference isn’t unusual).
Modern BFICs typically have multiple parallel RF paths on the chip that are routed to pins located either on the same edge and/or same corner of the IC package, often with all inputs (or outputs) also on the same edge. As a result, the challenge is in routing the multiple RF lines to and from these closely spaced pins on printed circuit boards (PCBs) while maintaining sufficient isolation between the lines.
This article discusses how the amount of isolation between transmission lines affects the performance of BFICs. It provides general guidelines on choosing the best transmission-line topology based on the application’s isolation requirement and BFIC geometries and covers how best to fanout closely spaced transmission lines near the BFIC. Dimensions are primarily in mils (1,000 mils is equal to 1 inch). To convert from mil to mm, multiply by 0.0254.
Isolation: From Transmission Line to Transmission Line
On any PCB, two adjacent transmission lines will have some amount of coupling between them, either electrically and/or through the electric and magnetic (EM) fields, resulting in noninfinite isolation. There are large differences in isolation performance between line topologies. Top-layer routing generally has worse isolation than buried lines due to field coupling.
Beyond the chosen line topology, the dominant factors that affect isolation are operating frequency, the distance between the lines, and the parallel routing distance of the lines. Also, if using a buried topology such as stripline, any transitions to the top layer must be designed carefully to maintain good isolation.
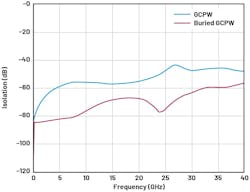
Figure 1 shows a Keysight RFPro EM simulation of isolation vs. frequency for two pairs of transmission-line topologies: grounded coplanar waveguide (GCPW) and buried GCPW. Center-to-center distance between each pair of lines was set at 60 mils with a parallel routing distance of 200 mils. Six-mil ground vias spaced at 25 mils center-on-center were used for fencing on either side of each line. GCPW has worse simulated isolation than buried GCPW. Clearly a buried topology should be chosen where isolation is critical.
GCPW vs. Buried GCPW: 15 dB of Isolation Can Make a World of Difference
Poor isolation between transmission lines on a PCB can be especially problematic in applications where there’s a large difference between the signal levels in the respective traces.
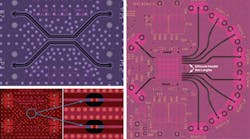
In a phased-array system, if two adjacent variable-amplitude-and-phase (VAP) blocks are operating at minimum and maximum attenuation, parasitic signal coupling will degrade the linearity of the VAP’s gain-control function in the more attenuated path. This behavior was observed on the ADAR3001, a 4-input, 4-output BFIC on a PCB with GCPW transmission lines. The PCB was redesigned with buried GCPW to increase the isolation between lines.
The RMS gain error is an abstracted figure of merit that’s an indicator of gain-control nonlinearity. In this case, RMS gain error was measured on both versions of the PCB. Figure 2a shows the RMS gain error of the original PCB with GCPW, while Figure 2b shows the RMS gain error of the redesigned PCB with buried GCPW.
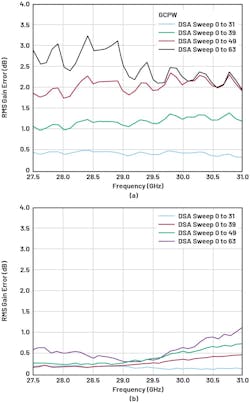
In Figure 2a, the RMS gain error is significantly worse when the VAP’s digital stepped attenuator (DSA) is exercised over its full range. This is to be expected because the application is most susceptible to poor isolation when the delta between a DSA’s attenuations is at its largest.
The higher line-to-line isolation of the buried GCPW board improved RMS gain errors significantly, aligning with simulations and displaying the actual performance of the BFIC. These results show that even a moderate improvement in isolation of 15 dB at 30 GHz can dramatically affect the measured performance.
Isolation of Two Parallel Striplines
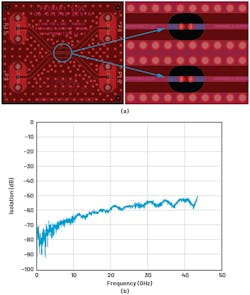
It’s generally assumed that stripline topology gives the best isolation of the topologies being discussed. To test this assumption, we fabricated an experimental board to see how much isolation over frequency could be achieved with a stripline topology. We employed an 8-mil-wide stripline design routed on layer 2 on 8-mil Rogers 4003C laminates (layer 1 to layer 2) and 8-mil Rogers 4450T laminates (layer 2 to layer 3) dielectrics. The center-to-center distance of the line pair was 76 mils and the parallel run length was 300 mils.
>>Download the PDF of this article
We chose these distances to approximately emulate the average pitch between RF pins of many BFICs, as well as the subsequent routing the lines must take before fanout to coaxial connectors or other devices. Each line had its own via fencing with 10-mil vias and 18-mil center-on-center pitch.
Figure 3a shows the stripline layout on layer 2 (not shown are the layer 1 and layer 3 ground planes that sandwich the stripline on either side of the Rogers dielectrics). The isolation measurement shown in Figure 3b clearly proves that uninterrupted stripline with tight via fencing yields optimum performance and should be used where isolation requirements are very high.
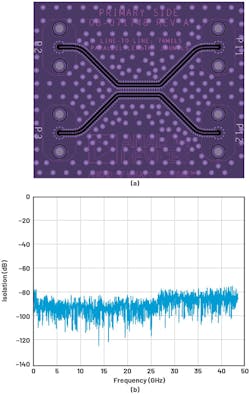
The isolation plot is noisy due to the isolation of the line pair being on the edge of the measurement capabilities of the vector network analyzer (VNA). The average isolation at all frequencies is better than −80 dB. The decrease in isolation that occurs at roughly 26 GHz is due to the VNA.
Isolation of Two Parallel Striplines with Back-to-Back L1-to-L2 Vias
On the same experimental board introduced in the previous section, we designed another pair of striplines with all of the same attributes as before (line geometry, via placement, line-to-line spacing, and parallel run length).
However, in this case, a pair of transition vias (or back-to-back layer 1 to layer 2 vias) were added to each line to see how isolation degrades when transitioning to the top layer, as shown on the left side in Figure 4a. Top-layer routing was kept short at 14 mils between via centers as shown in the zoomed-in image on the right side of Figure 4a.
Measurements show that isolation on these striplines with back-to-back transition vias is degraded compared with lines that have no transition vias (Fig. 4b). This experiment highlights the importance of careful via design when transitioning to the top layer for device interfacing.
Guidelines on Routing Multiple RF I/Os
Many ICs, RF beamformers in particular, have a high RF I/O count, which is difficult to route while maintaining good RF performance. Along with careful choice and design of the transmission-line topology, correct ground via fencing all the way into the device is key to maintaining RF performance — isolation in particular.
What Transmission Line Should be Used?
The decision on which transmission line to use should be primarily based on the isolation requirement and the geometries of the BFIC. For example, if the isolation only needs to be around −40 dB, then a GCPW can be safely used. Achieving isolation around −65 dB calls for the use of stripline.
Next, consider the geometry of the BFIC, especially the size of each pin, the pin-to-pin pitch, and the distance between RF pins. For example, say the BFIC is a ball-grid array (BGA) with a solder-ball diameter of 5.5 mils/0.22 mm, 10 mils/0.4 mm pin-to-pin pitch, and 30 mils/1.2 mm of distance between the closest RF pins, and the isolation requirement is −65 dB or better. Then the BFIC geometries could support a symmetrical stripline with approximate dimensions of 6-mil line width, a 6-mil-thick dielectric (above and below the line), and a 10-mil lateral gap to ground assuming a dielectric constant in the low threes.
The rule of thumb for stripline is to have a lateral gap-to-ground distance that’s approximately 2X that of the line width; smaller gap distances start to affect line impedance. Smaller distances between RF pins would require a thinner width, whereas a larger distance between RF pins would accommodate a wider line. The latter is preferable as there’s a higher chance of attaining 50 Ω in manufacturing.
Routing Near the Device
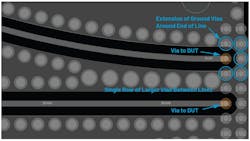
When using a stripline, care must be taken when transitioning to the device pin on the top layer, as this transition can degrade the isolation significantly unless one uses appropriate grounding vias. To attain the highest isolation, the ground wall of vias should extend around the end of the stripline at the device transition (Fig. 5). Doing this extends the critical ground wall required for best isolation performance.
The device should also have ground pins, bumps, and/or a ground paddle that surround the signal pin and should roughly coincide with the extended ground wall vias.
RF I/O pins located a short distance from each other may not provide enough area for each transmission line to maintain its same via fencing all the way into the device. Depending on available area, the typical options for the via fencing are:
- Use smaller vias if they don’t violate the fabricator’s aspect-ratio rules for the dielectric thickness.
- Stagger the vias in a sawtooth pattern where there’s a moderate amount of area if the absence of a via on one of the lines at the device interface will not degrade isolation.
- As shown in Figure 5, go to a single row of vias between the lines using a larger via size, while keeping the same distance between the edges of the via holes as was used on the smaller vias. This maintains the isolation performance.
- Go to a single row of vias between the lines using the same via size, when space is very limited between the lines.
The decision of when and how to fanout largely depends on where the RF I/O pins are in relation to each other on the device.
The general rule of thumb is that fanout should happen as soon as it’s feasible to reduce parallel runs and thereby keep isolation as high as possible. As seen in Figure 5, the fanout can happen immediately due to the relative positions of the RF I/O pins that are shown (as well as those not shown).
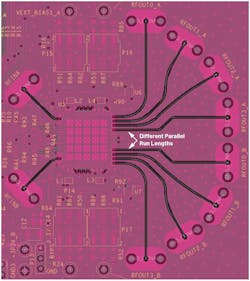
However, Figure 6 illustrates the fanout of a 2-channel, 8-output device where each channel has a 1:4 switch as an output stage, which drives four transmission lines of different parallel-run distances. In this case, the fanout was also constrained by the non-RF I/O routing and associated circuitry on the north and south side of the device. This limited where and how the eight transmission lines could be routed.
In summary, the advent of high-frequency multichannel beamformer and other RF ICs is making PCB design more challenging both in terms of transmission line and transition accuracy) as well as maintaining the high channel-to-channel isolation required to sustain device performance.
RF transmission-line designs are going through a forced migration from surface-level grounded coplanar waveguide to buried stripline. However, even with buried stripline designs, care must be taken to maintain isolation between adjacent traces using closely spaced via fencing that fully encircles the device’s pins. In addition, quick fanout of closely spaced traces from the device, creating separation of the traces, is helpful in maintaining high isolation.
>>Download the PDF of this article
About the Author
Joel Dobler
Principal Product Applications Engineer, Analog Devices
Joel Dobler is a principal product applications engineer in the Aerospace and Defense and Communications Group, focusing on beamformer products, but also supporting vector modulators and programmable low-pass filters. He has worked for Analog Devices since 2006, supporting a wide range of RF products including logarithmic and RMS detectors, digital and analog variable-gain amplifiers, mixers, and I/Q demodulators.
Joel received his BSEE from Washington State University in 2005 and his MEEE degree from Portland State University in 2007.