This file type includes high resolution graphics and schematics when applicable.
Measurement uncertainty impacts all instruments and measurements, no matter how well designed. Knowing more about the causes of measurement uncertainty and how to model it can provide greater confidence in the final results shown on an analyzer’s or other RF/microwave instrument’s display.
Designers typically apply a guard band around a performance parameter, such as insertion loss, to account for the difference between the acceptance test limit of the device under test (DUT) and the performance limit of the test equipment. The guard band can apply to measurement uncertainties as well as test-equipment performance variations due to drift over time, temperature, and other factors. Ideally, this guard band can be reduced as much as possible, although such a reduction requires a reliable estimation of measurement uncertainty. It must be done in a way that is relatively simple, fast, and conservative enough to inspire confidence in the measurement results.
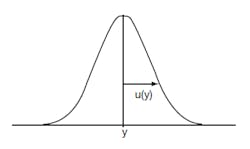
Measurement uncertainty characterizes the dispersion of values below and above those obtained from a measurement, where “P” is the measured value and “u” is the measurement uncertainty. Total uncertainty is expressed as P±u. Standard uncertainty is expressed as a standard deviation, u(y), as shown in Fig. 1, and relative uncertainty is standard uncertainty divided by the true value of the property being measured. The true value of this property must be estimated, so measurement uncertainty equals u(y) divided by “y.”
1. Standard uncertainty is expressed as a standard deviation, u(y). Relative uncertainty is standard uncertainty divided by the true value of the property being measured. Measurement uncertainty equals u(y) divided by “y”.
Mismatch uncertainty stems from incomplete knowledge of the phase of the reflection coefficients of the source and load impedances and their interconnection. It is defined as the amount of power (in dBm) unavailable at the output of a transmission line resulting from signal reflections and impedance mismatches. A transmission line that is properly terminated should suffer no reflections and, therefore, no mismatch loss.
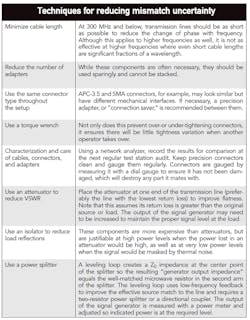
Mismatch uncertainty is typically the greatest contributor to overall uncertainty from measurements made by power meters, signal analyzers, noise-figure meters, network analyzers, oscilloscopes, and signal generators, as well as test components such as attenuators, directional couplers, cables, and adapters. Mismatch uncertainty can be reduced by minimizing the reflection coefficient of transmission lines and components used within the test setup. The table offers methods for achieving this.
Instrument uncertainty differs with each type of instrument. It can stem from switching, drift of bandpass filters, calibration, and nonlinearities within the instrument. With a signal analyzer, for example, changes to its internal configuration should be minimized to reduce uncertainties. This can be achieved by stepping through a measurement before taking data. The analyzer should also run its alignment process and should be characterized using a calibration signal close to the frequency of interest.
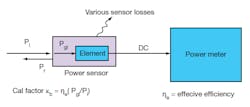
Power measurements can suffer a great deal of measurement uncertainty. There are many sources of uncertainty in these measurements, starting with the sensor and source impedance mismatch, followed by those from the power sensor and power meter. Referring to Fig. 2, Pgl represents the net power delivered to the sensor and is the incident power, Pi, minus the reflected power, Pr. However, not all of the input power is dissipated in the sensing element: Some is converted to heat in other parts of the sensor. The power registered on the meter is only that dissipated by the sensing element.
2. The net power delivered to the sensor (Pgl) is the incident power (Pi) minus the reflected power (Pr). As not all of the input power is dissipated in the sensing element but rather is retained as heat, the actual measured power is just the value that the sensing element dissipates.
The calibration factor, Kb, accounts for the imperfect efficiency of the sensor and the mismatch loss and reflected signal, and is unique to each sensor. The calibration factor is printed on a power sensor’s label or stored in an electronically erasable programmable read-only memory (EEPROM) for each sensor. A calibration sheet containing the unique calibration factor and reflection coefficient data is generally shipped with each sensor.
Components within a power meter contribute to measurement uncertainty and should be included in any uncertainty analysis, although the errors these components contribute are typically smaller than the source sensor mismatch and other sensor uncertainties. The most significant forms of power measurement uncertainty are power reference uncertainty and instrumentation uncertainty. For power reference uncertainty, thermocouple and diode sensors require a highly accurate, known power source to verify and adjust for the sensitivity of the individual sensor.
Power meters from Agilent Technologies, for example, employ a 1-mW (0-dBm), 50-MHz calibration source as a reference. Power reference uncertainty refers to the uncertainty in the output level of this calibration source, which is specified for Agilent’s calibration sources as ±0.6% for 2 yr. at +25±10°C. Instrument uncertainty is the combination of meter tracking, circuit nonlinearities, and amplifier gain uncertainties, and a manufacturer guarantees the accumulated uncertainty will be within a specific limit, such as ±0.5% for absolute average power measurements.
Determining total measurement uncertainty requires that all major sources of uncertainty be considered; once these have been identified, the uncertainties from each source can be estimated. Total measurement uncertainty is obtained by adding the uncertainties from each source. This is a conservative approach, and necessary if it cannot be determined whether the individual sources of uncertainty are independent of each other. If it can be determined these individual sources of uncertainty are independent, they can be added using the root-sum-of-squares (RSS) method.
In a power measurement, for example, the goal is to determine the power delivered to a reference impedance, Z0}, so the power sensor’s impedance would (ideally) also be Z0, and none of the signal would be reflected from the sensor. When the sensor impedance deviates from Z0, it represents a mismatch with the power source and reflections occur, with some source power failing to reach the sensing element; this makes a totally accurate measurement impossible. Since the source is typically mismatched, reflections will also occur at that point. Phase addition and subtraction of the incident and reflected waves create a voltage standing wave pattern on the transmission line and, although the exact power entering the sensor cannot be determined, the maximum and minimum power values can be calculated from the VSWR of the source and sensor.
When measuring the performance of RF and microwave subsystems and systems, correcting for mismatch with a high level of certainty requires knowledge of source and load reflection coefficients. Unfortunately, in many measurement situations only the reflection coefficient magnitude is known. Without the required phase information, it is impossible to accurately correct for a mismatch, which will then represent a source of error in a power measurement.
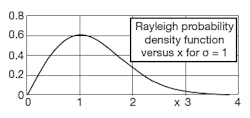
When phase is not known, there are three models available for assessing uncertainties: one well suited for determining mismatch uncertainty using measured values of reflection coefficient magnitude, another relying on Rayleigh distributed values when reflection coefficient magnitude must be assumed, and the third combining measured and assumed values. Of the three, the Rayleigh distribution model (Fig. 3) has greater utility and has been shown to provide a more accurate assessment of uncertainty.
3. The Rayleigh distribution model is accurate yet conservative, making it well suited for estimating mismatch uncertainty.
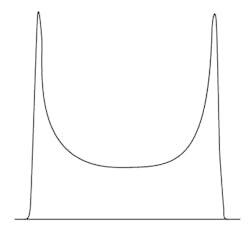
However, it is not as widely used as the technique described in ref. 1, which is based on the uncertainty of having a U-shaped distribution (Fig. 4) and assumes that reflection coefficient magnitudes always reflect the maximum amount stated on a manufacturer’s data sheet. The U-shaped probability distribution provides only one-half of the required information as total mismatch uncertainty requires knowledge of errors associated with the magnitude of reflection coefficient.
4. The model described by Harris and Warner has a U-shaped probability density function and is the model most widely used.
Total uncertainty can be determined by estimation and an associated uncertainty, or by assigning a probability density function (PDF) to the reflection coefficient magnitude. Assigning a PDF to reflection coefficient magnitude can be used when data is available from the instrument manufacturer’s data sheet, although each manufacturer states distribution of reflection coefficient magnitude differently. For example, power sensors, signal generators, and signal analyzers from Agilent Technologies feature guaranteed VSWR specifications; the company’s latest power sensors include a graph of typical VSWR versus frequency as well.
The model of ref. 1, known as the Harris and Warner model, accounts for the error associated with measured values of reflection-coefficient magnitude as well as the error caused by unknown phase. When it is necessary to assume reflection-coefficient magnitude values, the Rayleigh distribution gives the most accurate estimate of uncertainty. Investigations have shown that the Rayleigh model—when evaluated on power sensors, signal generators, and signal analyzers—provides results much closer to “reality” than other methods.
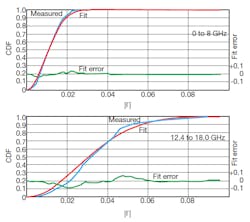
Since the Rayleigh model depends on a large number of reflective elements, it could be assumed that power sensors, the least complex of the three instruments studied, might not fit well with a Rayleigh distribution. In fact, the Rayleigh model is a good fit for power sensors and power measurements. Figure 5 compares the measured reflection-coefficient magnitude with a best-fit model from DC to 8 GHz and 12.4 to 18 GHz. The fit in the DC-to-8-GHz region is very close, with a good fit even at higher frequencies exhibiting variations in mean VSWR.
5. The cumulative distribution functions for Agilent’s 8481A power sensor in two frequency ranges demonstrate the Rayleigh model’s low level of fit error.
The accuracy of the Rayleigh model is apparent upon comparison with results from other models. With the popular U-shaped distribution equivalent to a known maximum reflection coefficient with uniformly distributed phase, the example of an Agilent model 8481A power sensor between 12.4 and 18 GHz shows a VSWR of 1.28:1 and a reflection coefficient of 0.123. The observed statistical distribution of reflection coefficient in the lower plot of higher frequencies in Fig. 5 shows no probability higher than 0.090, and only minor variations from a Rayleigh model with reflection coefficient between 0.01 and 0.08. The Rayleigh model is clearly much more accurate, even at its worst, than using the data-sheet specification.
The estimated uncertainty is roughly proportional to the median of the distribution function. The Rayleigh model achieves high accuracy by using the mean reflection coefficient. In fact, it usually provides a six times lower estimate of uncertainty than the U-shaped distribution approach. It is also conservative enough to allow a designer to reduce a guard band with confidence. In short, the Rayleigh model provides a fast, accurate estimate of standard uncertainty caused to mismatch and can help improve confidence in a variety of RF/microwave measurements.
Antonio Castro, R&D Electrical Engineer
Agilent Technologies, 5301 Stevens Creek Blvd., Santa Clara, CA 95051, www.agilent.com.
Reference
1. I.A. Harris and W.L. Warner, “Re-examination of mismatch uncertainty when measuring microwave power and attenuation,” Microwaves, Optics, and Antennas, IEE Proceedings, February 1981, Vol. 129, No. 1.
Footnote
1. Agilent Application Note 1449-3, “Fundamentals of RF and Microwave Power Measurements,” documents these practices. Along with the companion Average Power Sensor Uncertainty Calculator, it is available at www.agilent.com.
This file type includes high resolution graphics and schematics when applicable.


