Millimeter-Wave Cables: Time for a Checkup?
Download this article in PDF format.
This article was contributed by Pasternack Enterprises.
Microwave cable assemblies are often taken for granted and subjected to various types of abuse that reduce their performance and operating lives. At lower frequencies, this can be tolerated somewhat more easily, since cables and connectors are larger. But that’s not the case at millimeter-wave frequencies, which require smaller and typically more fragile cables that will not tolerate abuse.
The cellular industry, having operated below 3 GHz for its entire history, is about to exploit the spectrum between 28 and 100 GHz. In addition, the U.S. Department of Defense (DoD) has ramped up spending to counter threats from electronic warfare and radar at higher millimeter wavelengths. Consequently, there will be more millimeter-wave activity than ever before, so it’s a good time for a refresher about the care and handling of these vital components.
As high-level integration combines various functions in a single package or board, it’s likely that fewer microwave interconnects will be required at these frequencies. But there will still be a need for flexible, semi-flexible, semi-rigid, and other cable variants to connect subsystems even in devices like small cells. Also, every component and system operating at these high frequencies must be tested, so designers who haven’t yet experienced millimeter-wave measurement challenges will soon confront them.
Tackling Test Equipment
The test-and-measurement environment is one of the few that always places great importance on careful use and maintenance of cables, connectors, and assemblies (though it has not always been adhered to). Because measurement uncertainty is the bane of measurement systems, such attention to detail has been essential. Cost is another motivator due to precision vector-network-analyzer (VNA) test cables being so expensive. The same scenario applies to all types of interconnects used at millimeter wavelengths, as they are precision-machined, delicate instruments.
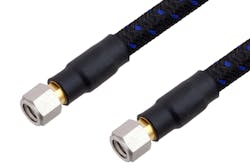
For example, the PE3TC1220 family of 110-GHz test cable assemblies from Pasternack are typical of those designed for use with VNAs and semiconductor probe testing (Fig. 1). They have male 1.0-mm connectors at each end and are armored with Nomex for protection. Insertion loss at 110 GHz is 5.6 dB or less, typical VSWR is 1.5:1, and one-time minimum bend radius is one inch. The connectors have beryllium copper, gold-plated bodies and passivated stainless-steel coupling nuts. The assemblies are available in 6- and 12-in. lengths.
1. The PE3TC1220 family of 110-GHz test cable assemblies are designed for VNAs and semiconductor probe testing.
It’s hard to overstate the importance of taking care of cables and connectors at these frequencies. Component size is related to wavelength, so cables (and connectors) at millimeter-wave frequencies are very small. This is great from a form-factor perspective, but problematic for everything else from materials to fabrication to performance. Their properties also require all who use them to be extremely careful. Even tiny bits of dust and almost imperceptible scratches and other damage can degrade measurement accuracy.
For instance, a full wavelength at 60 GHz is about 5 mm and a half-wavelength antenna at this frequency measures about 2.5 mm. Millimeter-wave connectors range from 2.92 to 1.0 mm. In addition, a 0.8-mm connector for frequencies above 110 GHz is in the wings. Larger connectors for HF through UHF frequencies are enormous compared to these connectors—a full wavelength at 100 MHz is 3 m and a full wavelength at 1 GHz measures 30 cm.
Since loss is a huge consideration at millimeter-wave frequencies, the fewest possible interconnects are used to connect a device under test (DUT) to the instruments and any other components in the transmission chain. In addition to lowering insertion loss, this reduces the number of places where discontinuities can occur, simplifies the setup, and limits points of entry for dirt and dust.
Basic Yet Crucial Mating Procedures
The center conductor and dielectric of a millimeter-wave cable or connector is easily damaged if it is misaligned when mated to its counterpart. Even a slight variance from parallel between the connector and its interfacing other can have negative consequences. The proper approach is to firmly grasp the body of the connector so that it can’t rotate and potentially degrade the finish and plating of contacts and transfer torque to the cable assembly. Dirty connectors or those suspected of being damaged should never be mated, nor should connectors whose pins are not aligned, have been damaged from being over-torqued, or whose coupling nut has been cross threaded.
Although few engineers would admit it, torque wrenches aren’t always used to secure coupling nuts. The use of torque wrenches is sometimes even avoided in sensitive test-and-measurement environments, as novices and veterans alike develop a “feel” for when a connector is properly seated and torqued. However, once it is over-torqued, a connector will pass along its imperfections to its counterpart as well as every connector to which it is mated, with the result being “consistently inconsistent” measurement results.
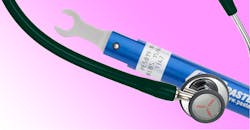
A torque wrench used for millimeter-wave connectors is a precise tool. One such example is Pasternack’s PE5019-16 break-over torque wrench for 1.0-mm connectors—it has a preset value of 4 in.-lbs. so that mating force will never be exceeded (Fig. 2). The break-over type has the advantage of stopping force at the pivot point once the preset torque value is reached. Its accuracy is ±0.15 in.-lbs. and hex size is 6 mm.
2. The PE5019-16 torque wrench for 1.0-mm connectors is a break-over type of wrench, which eliminates the possibility of over-torquing the connector.
Every cable assembly has a maximum bend radius; once that’s exceeded, it will initially degrade measurement results and ultimately destroy the assembly. While in some cases a tight bend might seem inescapable, it should still be avoided because just one mistake can ruin a millimeter-wave cable. Thus, the widest possible bend radius should always be used.
It’s also important not to twist the cable, as this will likely damage both the cable and the integrity of the assembly and potentially damage the connector. Wrinkles or other signs of stress visible on the cable jacket are good indications that it has been severely twisted, or its bend radius specification was exceeded.
Uber-Cleanliness
When tolerances are so tight, as they are in millimeter-wave components, all interfaces must be clean. Although it might seem extreme, using a microscope for examination is not a bad idea. The cleaning process is simple to perform: Simply get a lint-free cloth (polyester is a good choice), moisten it with isopropyl alcohol, and gently wipe the components clean. Filtered compressed air or nitrogen can be used. But beware of chlorinated solvents typically housed in pressurized cans. They are designed to provide deep penetration that can potentially do more harm than good.
Having performed this process, using a magnifying glass, inspect the surfaces, and repeat the process if necessary to ensure that any metallic particles or any other substances have been removed. While the magnifying glass is handy, it pays to inspect the interface. Potential defects include bent pins, missing pin tines, damage to the dielectric, worn or damaged threads, or any other visible appearance of damage. If any of these are spotted, replace the cable.
Cables used with flightline measurement systems generally experience the greatest abuse. This is because some people making these measurements understand how cables must be treated, while others who handle them may not. Stories abound of measurement carts being dragged along by their cables. Other adverse scenarios include cables that are used for support, as well as cables that have been pinched, crushed, stepped on, or have passed over sharp edges. This environment is also where maximum bend radius is regularly exceeded.
Although it is often difficult to eliminate these situations, whoever is responsible for maintaining the measurement system should at least do his or her best to ensure that only undamaged cable assemblies are used. A “drip loop” should always be created in outdoor measurement environments. That’s because water can move down the cable and to the connector, eventually resulting in performance changes such as increased insertion loss.
Flightline conditions also place cable assemblies in hostile environments where oils and other liquids, as well as gases, may be present. In these areas, the cables may not be directly exposed, but that could be the case for those using them. Cables designed for test-and-measurement applications are designed to meet rugged service, but not necessarily exposure to every hostile scenario.
A variety of materials are used for microwave cable jacketing. Each type has advantages and disadvantages when used in challenging environments. Polyurethane, for example, resists solvents, UV rays, radiation, and fungus, but not chemicals used for cleaning. Fluoropolymers such as fluorinated ethylene propylene (FEP), perfluoroalkoxy (PFA), and polytetrafluoroethylene (PTFE) are well-suited for cable jacketing in these environments—they can withstand high temperatures as well as exposure to chemicals, acids, and invasive solvents. They’re also not flammable.
Moisture is the enemy of all types of cables, as it tends to increase cable loss over time because the outer conductor or shield becomes oxidized. When RF power is applied, water absorbed by the dielectric increases in temperature. There are several points of entry for water or water vapor, from even tiny holes in the jacketing material to spaces where the connectors meet the cable or where the connectors meet their matching interface.
In the case of cable-to-connector and connector-to-connector interfaces, a water-resistant boot can be used. However, water vapor may find its way into very small abrasions in the cable jacketing that are almost impossible to see without using a magnifying glass under bright light. Periodic attention to jacket condition is worth the time required to perform it, as over time, a damaged cable will reduce performance or ultimately fail. Not surprisingly, shipboard or coastal environments offer a major opportunity for entry of salt mist, which corrodes metal inside the cable as well as on or in the connector components if their plating has been damaged.
Summary
Operation at millimeter wavelengths presents major challenges, which is why the mmWave region has been explored only for those few applications with suitable characteristics. Communications has rarely been one of them.
However, that will change in the next decade, as the cellular industry takes advantage of the almost unlimited available bandwidth. This development, along with defense activity, means that it will be more important than ever for designers to take extra precautions to ensure their cable assemblies not only deliver desired performance, but have long, trouble-free operating lifetimes.


